
Mazda 6 Service Manual: Headlight cleaner switch inspection
1. Disconnect the negative battery cable.
2. Remove the headlight cleaner switch. (See HEADLIGHT CLEANER SWITCH REMOVAL/INSTALLATION)
3. Inspect for continuity between the headlight cleaner switch terminals using an ohmmeter.
- If not as specified, replace the light switch.
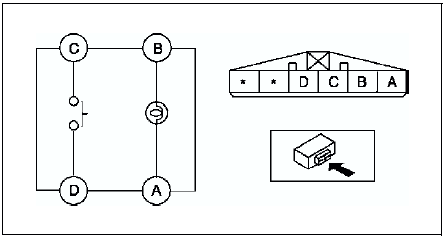
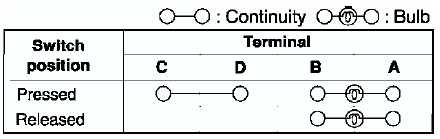
 Headlight cleaner switch removal/installation
1. Disconnect the negative battery cable.
2. Remove in the order indicated in the table.
3. Install in the reverse order of removal.
Headlight Cleaner Switch Removal Note
1. Insert your hand f ...

Other materials:
Mazda 6 Service Manual: Recommended Tire Inflation Pressure
On the tire label you will find the recommended tire inflation pressure in both
kPa and psi for the tires installed as original equipment on the vehicle. It is
very important that the inflation pressure of the tires on your vehicle is maintained
at the recommended pressure.
You should check t ...
Mazda 6 Service Manual: Schedule 1
Chart symbols:
I: Inspect: Inspect and clean, repair, adjust, fill up, or replace if
necessary.
R: Replace
L: Lubricate
T: Tighten
Remarks:
*1 Use of FL-22 is recommended when replacing engine coolant. Using engine coolant
other than FL-22 may cause serious damage to the engine and cooli ...