
Mazda 6 Service Manual: Headlight zeroset
Note
- When the configuration is not set for the auto leveling control unit, headlight zeroset cannot be executed.
1. Adjust the tire air pressure to the specification.
2. Position the unloaded vehicle on a flat, level surface.
3. Connect the SST (WDS or equivalent) to the DLC-2.
4. Turn the ignition switch to ON position.
5. Turn on the headlights (low-beam).
6. Input the vehicle information following the directions on the screen.
7. Confirm that the WDS or equivalent identifies the vehicle, and select Datelogger.
8. After the screen appears, select LHID under Modules from the cascading menu.
9. After the next screen appears, select CALAXLSN#.
10. On the graphic display that appears, press the icon near the top right of the screen indicated by a 1 in the figure.
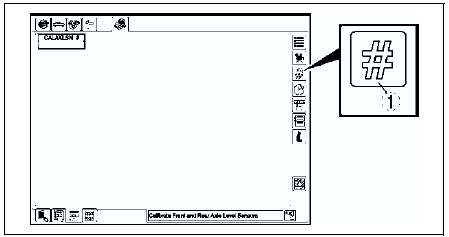
11. After the next screen appears, press the icon indicated by a 2 in the figure.
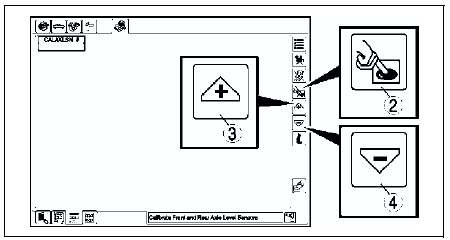
12. After pressing the icon indicated by the 2, press the icon indicated by a 3 or 4 in the figure to execute the zeroset setting.
Note
- Pressing an icon indicated by 3 or 4 once will execute the headlight zeroset setting.
13. After executing the headlight zeroset setting, perform an on-board diagnostic test and verify that no DTCs are displayed.
14. Perform the headlight aiming adjustment. (See HEADLIGHT AIMING)
 Auto leveling control unit configuration
1. Connect the SST (WDS or equivalent) to the DLC-2.
2. Input vehicle information following the directions on the screen.
3. Select Module programming.
4. Select Programmable module installation. ...
 Front auto leveling sensor removal/installation
1. Disconnect the negative battery cable.
2. Jack up the vehicle and remove the wheel and tire.
3. Remove in the order indicated in the table.
4. Install in the reverse order of removal.
5. Ad ...
Other materials:
Mazda 6 Service Manual: Headlight cleaner switch removal/installation
1. Disconnect the negative battery cable.
2. Remove in the order indicated in the table.
3. Install in the reverse order of removal.
Headlight Cleaner Switch Removal Note
1. Insert your hand from the lower side of the dashboard and squeeze the tabs
of the headlight cleaner switch.
2. Pull ...
Mazda 6 Service Manual: No.1 while vehicle is in reverse, vehicle locator mark goes forward
When performing an asterisked (*) troubleshooting inspection, shake the
wiring harness and connectors while doing the inspection to discover whether
poor contact points are the cause of any intermittent malfunction. If there
is a problem, check to make sure connectors, terminals and wiri ...