Mazda 6 Service Manual: Information display removal/installation
1. Disconnect the negative battery cable.
2. Remove the center panel module. (See CENTER PANEL MODULE REMOVAL/INSTALLATION.)
3. Remove the LCD unit. (with car-navigation system) (See LCD UNIT REMOVAL/INSTALLATION.)
4. Remove the center box. (without car-navigation system)
5. Remove in the order indicated in the table.
6. Install in the reverse order of removal.
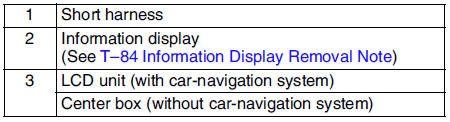
Information Display Removal Note
Squeeze the tabs of information display and pull it forward to it.
 Horn removal/installation
1. Disconnect the negative battery cable.
2. Bend the mud guard.
3. Remove in the order indicated in the table.
4. Install in the reverse order of removal. ...

Other materials:
Mazda 6 Service Manual: High-mount brake light removal/installation
4SD
In-vehicle-type
1. Disconnect the negative battery cable.
2. Remove in the order indicated in the table.
3. Install in the reverse order of removal.
Rear spoiler type
1. Disconnect the negative battery cable.
2. Remove the rear spoiler. (See REAR SPOILER REMOVAL/INSTALLATION)
3. Remo ...
Mazda 6 Service Manual: A/c compressor removal/installation
1. Disconnect the negative battery cable.
2. Discharge the refrigerant from the system. (See RECOVERY.) (See CHARGING.)
3. Remove the right side splash shield and mudguard (L.H.D. only).
4. Loosen the drive belt and remove it.
Caution
If moisture or foreign material enters the refrigeration ...