Mazda 6 Owners Manual: Locking, Unlocking with Request Switch, Door Handle (With the advanced keyless function)
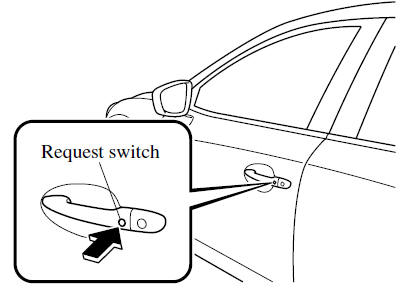
All doors can be locked/unlocked by pressing the request switch on the front doors while the key is being carried.
Front doors
To lock
To lock the doors , press the request switch and the hazard warning lights will flash once.
A beep sound will be heard once.
To unlock
Driver's door request switch
To unlock the driver's door, press the request switch. A beep sound will be heard twice and the hazard warning lights will flash twice.
To unlock all doors, press the request switch again within 3 seconds and two more beep sounds will be heard.
Front passenger door request switch
To unlock all doors, press the request switch. A beep sound will be heard twice and the hazard warning lights will flash twice.
NOTE
- The system can be set to unlock all doors by performing a single operation.
Use the following procedure to change the setting.
1. Switch the ignition off and close all of the doors and the trunk lid.
2. Open the driver's door
3. Within 30 seconds of opening the driver's door, press and hold the UNLOCK button on the key for 5 seconds or longer (the sound of the doors locking/unlocking can be heard).
After this, the system switches the setting of pressing the driver's request switch once or twice to unlock all doors each time the UNLOCK button is pressed (the sound of the doors locking/ unlocking can be heard).
4. The setting change is completed by doing any one of the following:
- Switching the ignition to ACC or ON.
- Closing the driver's door.
- Opening the trunk lid.
- Not operating the key for 10 seconds.
- Pressing any button except the UNLOCK button on the key.
- Pressing a request switch.
- Confirm that all doors are securely locked.
For the trunk lid, move it without pressing the electric trunk lid opener to verify that the trunk lid has not been left ajar.
- All doors cannot be locked when any door is open.
- It may require a few seconds for the doors to unlock after the request switch is pressed.
- A beep sound is heard for confirmation when the doors are locked/unlocked
using the request switch. If you prefer, the beep sound can be turned off. The
volume of the beep sound can also be changed.
Use the following procedure to change the setting.
1. Switch the ignition off and close all of the doors and the trunk lid.
2. Open the driver's door.
3. Within 30 seconds of opening the driver's door, press and hold the LOCK button on the key for 5 seconds or longer.
All of the doors lock and the beep sound activates at the currently set volume. The setting changes each time the LOCK button on the key is pressed and the beep sound activates at the set volume. (If the beep sound has been set to not activate, it will not activate.)
4. The setting change is completed by doing any one of the following:
- Switching the ignition to ACC or ON.
- Closing the driver's door.
- Opening the trunk lid.
- Not operating the key for 10 seconds.
- Pressing any button except the LOCK button on the key.
- Pressing a request switch.
- (With theft-deterrent system)
The hazard warning lights flash when the theft-deterrent system is armed or turned off.
Refer to Theft-Deterrent System.
- The setting can be changed so that the doors are locked automatically
without pressing the request switch.
(Auto-lock function)
A beep sound is heard when all doors are closed while the advanced key is being carried. All doors are locked automatically after about three seconds when the advanced key is out of the operational range. Also, the hazard warning lights flash once. (Even if the driver is in the operational range, all doors are locked automatically after about 30 seconds.) If you are out of the operational range before the doors and the trunk lid are completely closed or another key is left in the vehicle, the auto-lock function will not work. Always make sure that all doors and the trunk lid are closed and locked before leaving the vehicle. The auto-lock function does not close the power windows.
- Auto re-lock function
After unlocking with the request switch, all doors will automatically lock if any of the following operations are not performed within about 30 seconds.
If your vehicle has a theft-deterrent system, the hazard warning lights will flash for confirmation.
The time required for the doors to lock automatically can be changed.
- Opening a door or the trunk lid.
- Switching the ignition to any position other than off.
 Locking, Unlocking with Auxiliary Key
Turn the auxiliary key toward the front to lock, toward the back to unlock.
To lock
All doors lock automatically when the driver's door is locked using the auxiliary
key.
To unlock
The driver’ ...
 Locking, Unlocking with Transmitter
All doors can be locked/unlocked by operating the keyless entry system transmitter,
refer to Keyless Entry System. ...
Other materials:
Mazda 6 Owners Manual: Throttle position (tp) sensor inspection
Note
Perform the following inspection only when directed.
Resistance Inspection
1. Perform the following test only when directed.
If as specified but TP PID value is out of specification, inspect
resistance of TP sensor.
If not as specified, inspect the following:
- Accelerato ...
Mazda 6 Owners Manual: High Beam Control System (HBC) (Some models)
The High Beam Control System (HBC) determines the conditions in front of the
vehicle using the Forward Sensing Camera (FSC) while driving in darkness to automatically
switch the headlights between high and low beams.
Refer to Warning/Indicator Lights.
While driving the vehicle at a speed of ab ...