Mazda 6 Service Manual: Rear door glass removal/installation
1. Fully down the rear door glass.
2. Remove the rear door trim.
3. Remove the hole cover.
4. Pull up the rear door weatherstrip and remove the screw.
5. Remove the bolt.
6. Remove the glass run channel from the rear door glass guide.
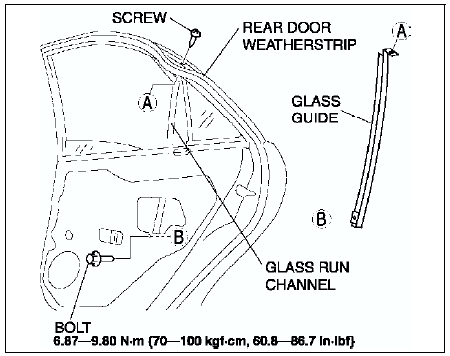
7. Lift the rear door glass to the position where the rear door glass installation screw is visible.
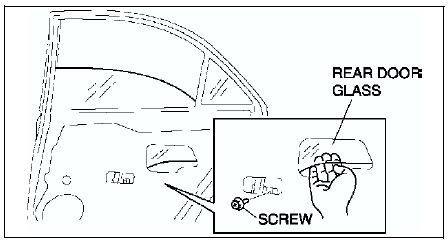
8. Remove the screw.
9. Insert your hand through the rear door unit hole and lift out the rear door glass.
10. Install in the reverse order of removal.
 Front door glass removal/installation
1. Operate the front door glass so that the distance from the top of the
front door glass to the upper part of the rear beltline molding is 210 mm
{8.3 in}.
2. Disconnect the negative battery c ...
 Front door unit removal/installation
1. Remove the front door glass.
2. Remove the inner handle.
3. Remove the front door speaker.
4. Disconnect the power window motor connector, front door lock actuator
connector, power outside mir ...
Other materials:
Mazda 6 Service Manual: Starting procedure for on-board diagnostic test mode
Note
All DTCs displayed in the on-board diagnostic test mode should be
entered in the Audio Repair Order Form.
1. Turn the ignition switch to the ACC or ON position.
2. First press the POWER button, then simultaneously press the AM button and
TAPE/MD button for 2 seconds or more.
N ...
Mazda 6 Service Manual: Variable valve timing actuator removal/installation
L3
Caution
Variable valve timing actuator can not be disassembled because it
is a precision unit.
Note
Variable valve timing actuator camshaft sprocket is integrated
with the variable valve timing actuator and cannot be disassembled.
1. Follow the timing chain removal/installati ...