Mazda 6 Service Manual: Rear door trim removal/installation
1. Disconnect the negative battery cable if equipped with power window system.
2. Remove the regulator handle if equipped.
3. Open the cap using a small screwdriver, then remove the screw.
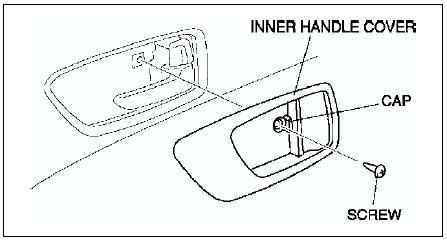
4. Remove the inner handle cover.
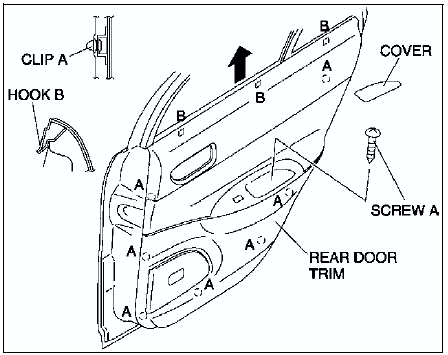
5. Remove the cover, then remove screw.
6. Disengage clips A from the rear door using a fastener remover.
7. Pull the rear door trim upward, then disengage hooks B from the rear door.
8. Disconnect the power window subswitch connector if equipped.
9. Remove the rear door trim.
10. Remove the switch panel from the rear door trim.
11. Install in the reverse order of removal.
 Front door trim removal/installation
1. Disconnect the negative battery cable.
2. Open the cap using a small screwdriver, then remove the screw.
3. Remove the inner handle cover.
4. Remove the inner garnish.
5. Remove the cover, th ...
 Tire house trim removal/installation
4SD
1. Remove the rear scuff plate.
2. Remove the rear seat side.
3. Remove the fastener.
4. Pull the tire house trim upward, then disengage clips A from the body, and
remove the tire house tr ...
Other materials:
Mazda 6 Service Manual: Clutch switch inspection
Note
Perform the following inspection only when directed.
Continuity Inspection
1. Verify that the clutch switch is installed properly.
2. Disconnect the negative battery cable.
3. Remove the clutch switch.
4. Inspect for continuity between the clutch switch terminals using an
ohmmeter. ...
Mazda 6 Service Manual: Seat belt inspection
Belt
1. Confirm that the seat belt is installed correctly.
2. Inspect the seat belt for damage and deformation of metal parts.
If any damage is found, replace as necessary.
ELR
1. Verify that the belt can be pulled out smoothly, and that it moves
smoothly when wound.
If not as specif ...