Mazda 6 Service Manual: Vehicle speedometer sensor (vss) inspection
Visual Inspection
1. Remove the VSS. (See VEHICLE SPEEDOMETER SENSOR (VSS) REMOVAL/INSTALLATION.)
2. Make sure that the sensor is free of any metallic shavings or particles.
- If any are found on the sensor, clean them off.
3. Install the VSS. (See VEHICLE SPEEDOMETER SENSOR (VSS) REMOVAL/INSTALLATION.)
Wave profile Inspection
1. Remove the PCM. (See PCM REMOVAL/INSTALLATION.)
2. Connect WDS or equivalent to DLC connector.
3. Connect osilloscope test leads to the following PCM connector terminals.
- (+) lead: PCM terminal 3C
- (-) lead: PCM terminal 1D
4. Start the engine.
5. Monitor VSS PID.
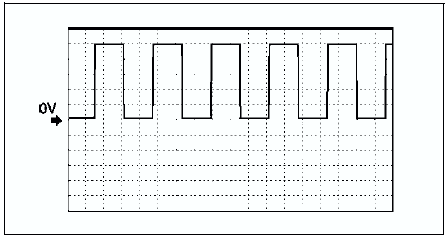
6. Inspect wave profile.
- PCM terminal: 3C (+) - 1D (-)
- Oscilloscope setting: 1 V/DIV (Y), 2.5 ms/DIV (X), DC range
- Vehicle condition: drive the vehicle with 32 km/h{20 mph}
- If wave profile or voltage are out of specifications, carry out the Open Circuit Inspection or Short Circuit Inspection

Power Supply Voltage Inspection
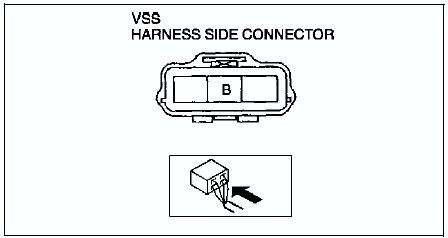
1. Disconnect the VSS connector.
2. Turn the ignition switch to ON.
3. Measure voltage at VSS connector terminal B (wiring harness side).
Specification
4.5-5.5 V
- If voltage is okay, go to Open Circuit Inspection and Short Circuit Inspection.
- If voltage is wrong, repair wiring harness between VSS and PCM.

Open Circuit Inspection
Inspect the following circuit for open.
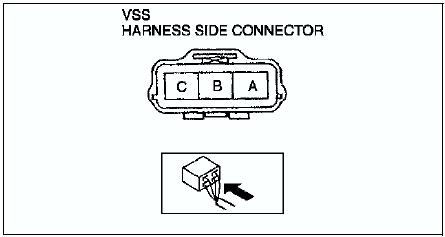
- Power circuit (VSS connector terminal A to main relay terminal D)
- Ground circuit (VSS connector terminal C to GND)
- If an open circuit or short circuit is found, repair the malfunctioning wiring harness.
- If there are no open or short circuits, perform the sensor rotor inspection.
Short Circuit Inspection
Inspect the following circuit for short.
- Power circuit (VSS connector terminal A to main relay terminal D)
- If an open circuit or short circuit is found, repair the malfunctioning wiring harness.
- If there are no open or short circuits, perform the sensor rotor inspection.

Sensor Rotor Inspection
1. Remove the VSS. (See VEHICLE SPEEDOMETER SENSOR (VSS) REMOVAL/INSTALLATION.)
2. Shift the selector lever to N position.
3. Inspect sensor rotor surface via VSS installation hole while rotating the front tire manually.
(1) Is sensor rotor free of damage and cracks?
(2) Is sensor rotor free of any metallic shavings or particles?
- If sensor rotor is okay, replace the VSS.
- If there is a problem, clean or replace the sensor rotor.
 Input/turbine speed sensor removal/installation
1. Disconnect the negative battery cable.
2. Remove the battery and battery tray.
3. Remove the air cleaner component. (See INTAKE-AIR SYSTEM
REMOVAL/INSTALLATION.)
4. Disconnect the input/turbin ...
 Vehicle speedometer sensor (vss) removal/installation
Caution
Water or foreign objects entering the connector can cause a poor
connection or corrosion. Be sure not to drop water or foreign objects on the
connector when disconnecting it.
If fo ...
Other materials:
Mazda 6 Service Manual: Heating
1. Set the mode selector dial to the
position.
2. Set the air intake selector to the outside air position (indicator light turns
off).
3. Set the temperature control dial to the hot position.
4. Set the fan control dial to the desired speed.
5. If dehumidified heating is desired, turn on the ...
Mazda 6 Service Manual: Joint shaft removal/installation
Caution
Performing the following procedures without first removing the ABS
wheel-speed sensor may possibly cause an open circuit in the harness if it
is pulled by mistake. Before performing the following procedures, remove the
ABS wheel-speed sensor and fix it to an appropriate place wh ...
