Mazda 6 Service Manual: Wheel and tire
WHEEL BALANCE ADJUSTMENT (16 INCH AND 17 INCH ALUMINUM ALLOY WHEEL)
Caution
- Adjust the outer wheel balance first, then the inner wheel balance.
- Be careful not to scratch the wheels.
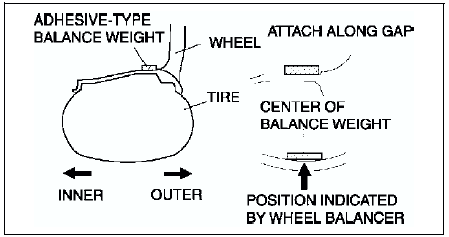
Adhesive-type Balance Weight (Outer)
1. Remove the old balance weight from the wheel.
2. Remove the double-sided adhesive tape remaining on the wheel, then clean and degrease the bonding area.
3. Set the wheel on a wheel balancer, measure the amount of unbalance and the position with the mode set for knock-type balance weight.
4. Multiply the amount of unbalance by 1.6
to get the balance weight value.
5. Select a balance weight closest to the weight value and attach the balance weight on the position (outer) indicated by the wheel balancer.
Example calculation of balance weight value Indicated amount of unbalance: 23 g {0.81 oz} 23 g {0.81 oz}×1.6 = 36.8 g {1.30 oz} Selected balance weight value: 35 g {1.24 oz}
Note
When selecting a balance weight, select one closest to the calculated value.
Example: 32.4 g {1.14 oz}= 30 g {1.06 oz}, 32.5 g {1.15 oz}= 35 g {1.24 oz}
Caution
- Use a genuine balance weight or equivalent (steel).
- When attaching the weight balance, press the balance weight with a force of 25 N {2.5 kgf, 5.5 lbf} per 5 g for 2 seconds or more.
6. If attaching 2 balance weights, position them so that each is on either side of the position indicated by the wheel balancer.
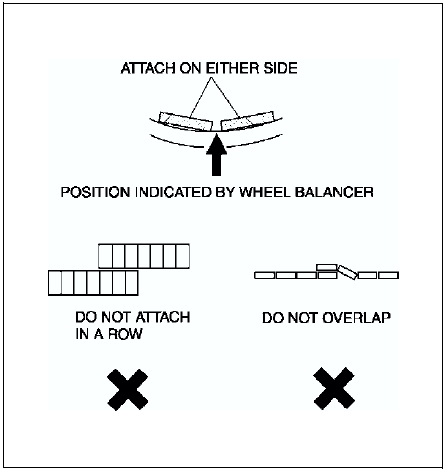
Caution
- Do not attach weight balances in a row.
- Do not overlap the balance weights.
- Total weight must not exceed 160g {5.65 oz}.
Knock-type Balance Weight (Inner)
1. Measure the amount of unbalance with a wheel balancer.
2. Attach a balance weight corresponding to the measured weight value on the position (inner) indicated by the wheel balancer.
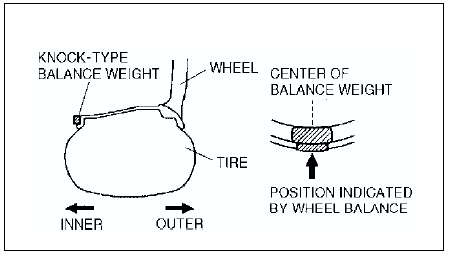
Caution
- Do not attach 3 or more balance weights.
- One balance weight must not exceed 60g {2.12 oz}, and a total of 2 balance weights must not exceed 100g {3.53 oz}.
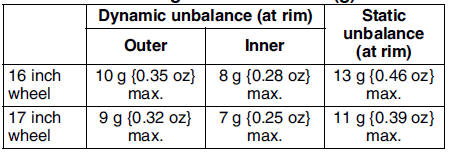
Remaining Amount of Unbalance Confirmation
1. After installing the outer and inner balance weights, operate the wheel balancer again.
2. Confirm that the remaining unbalance does not exceed followings on either side.

- If the remaining unbalance exceeds 10 g {0.35 oz}
(16 inch wheel) or 9g {0.32 oz}
(17 inch wheel), perform wheel balance adjustment again.
Allowable remaining unbalance value (g)
 Rear wheel alignment
Specification (Unloaded)*1
Normal
Elevated*3
*1 : Engine coolant and engine oil are at specified level. Spare tire, jack
and tools are in designated position.
*2 : Difference between left an ...
 Front suspension
...
Other materials:
Mazda 6 Service Manual: Fuel tank inspection
Caution
Disconnecting/connecting the quick release connector without
cleaning it may possibly cause damage to the fuel pipe and quick release
connector. Always clean the quick release connector joint area before
disconnecting/connecting using a cloth or soft brush, and make sure that it ...
Mazda 6 Service Manual: Rear upper arm removal/installation
Caution
Performing the following procedures without first removing the ABS
wheel-speed sensor may possibly cause an open circuit in the harness if it
is pulled by mistake. Before performing the following procedures, remove the
ABS wheel-speed sensor (axle side) and fix it to an appropri ...