Mazda 6 Service Manual: Brake pedal inspection
Brake Pedal Height Inspection
Verify that the distance from the carpet to the center of the upper surface of the pedal pad is as specified.
Pedal height (reference value)

Brake Pedal Height Adjustment
1. Loosen locknut B and turn the bolt A until it does not contact the pedal.
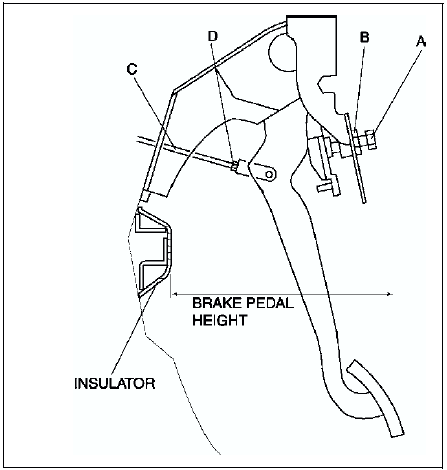
2. Loosen locknut D and turn rod C to adjust the height.
3. Tighten the bolt with locknut B.
Tightening torque 9.8-14.7 N·m
{100-149 kgf·cm, 116-130 in·lbf}
4. After adjustment, inspect the pedal play and the brake light operation.
Brake Pedal Play Inspection
1. Depress the pedal a few times to eliminate the vacuum in the system.
2. Remove the spring pin, verify that the holes in the fork and in the pedal are aligned, and reinstall the pin. (See BRAKE PEDAL REMOVAL/INSTALLATION.)
3. Gently depress the pedal by hand until resistance is felt, and check the pedal play.
Pedal play
0-3 mm {0-0.1 in}
Brake Pedal Play Adjustment
1. Remove the spring pin and clevis pin. (See BRAKE PEDAL REMOVAL/INSTALLATION.)
2. Loosen locknut D and turn rod C to align the holes in the fork and in the pedal.
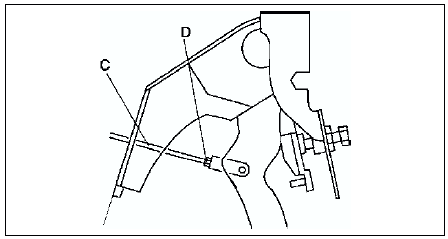
3. Install the clevis pin and the spring pin.
4. Tighten locknut D.
Tightening torque 15.7-21.6 N·m
{1.61-2.20 kgf·m, 11.6-15.9 ft·lbf}
5. Check the pedal height and the brake light operation.
Pedal-to-floor Clearance Inspection
1. Start the engine and depress the brake pedal with a force of 588 N {60 kgf, 132 lbf}
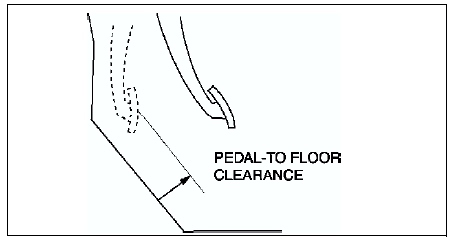
2. Verify that the distance from the floor panel to the pedal pad center is as specified when the pedal is depressed.
- If the distance is less than specified, check for the air in brake system.
Specification
68 mm {2.7 in} min.
 Vacuum hose check valve inspection (power brake unit)
1. Remove the clamps and vacuum hose.
2. Apply both suction and pressure to the engine-side hose, and verify that
air blows only toward that side.
If air flows in both directions or not at all, ...
 Brake switch inspection
1. Disconnect the negative battery cable.
2. Disconnect the brake switch connector harness.
3. Inspect for continuity between the brake switch connector terminals.
If not as specified, replace t ...
Other materials:
Mazda 6 Service Manual: Parking brake (lever type) adjustment
1. Start the engine and depress the brake pedal several times.
2. Stop the engine.
3. Remove the ashtray behind the center console.
4. Turn the adjusting nut as shown in the figure.
5. After adjustment, inspect the following points:
(1) Turn the ignition switch to ON, pull the parking brak ...
Mazda 6 Service Manual: Rear map light removal/installation
1. Disconnect the negative battery cable.
2. Remove in the order indicated in the table.
3. Install in the reverse order of removal.
Rear Map Light Removal Note
1. Insert a tape-wrapped flathead screwdriver into the gap between the
headliner and the rear map light.
2. Push the hooks to re ...