Mazda 6 Service Manual: Diagnostic assist function
Structural View
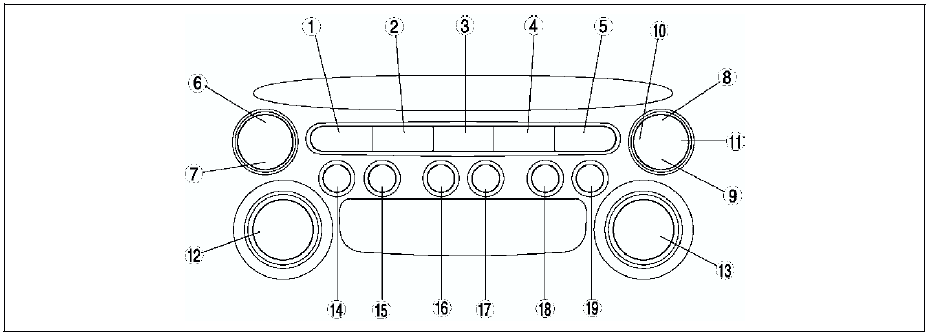
Switch location
LCD Inspection
1. With audio on, first press the POWER button, then simultaneously press the SEEK button (upper) for approximately 1 second.
2. Inspect the LCD according to the following table:

3. Turn the audio off or the ignition switch to the LOCK position to stop the diagnostic assist function.
Button Inspection
1. With audio on, first press the POWER button, then simultaneously press the TAPE/MD button for approximately 1 second.
2. Inspect the button according to the following table:

3. Turn the audio off or the ignition switch to the LOCK position to stop the diagnostic assist function.
Speaker Inspection
1. With audio on, first press the POWER button, then simultaneously press the AUTO-M button for approximately 1 second.
2. Inspect the speaker according to the following table:

3. Turn the audio off or the ignition switch to the LOCK position to stop the diagnostic assist function.
Radio Reception Condition Inspection
1. With audio on and at radio mode, first press the POWER button, then simultaneously press the preset button 2 for approximately 1 second.
2. Inspect the radio reception condition according to the following table:
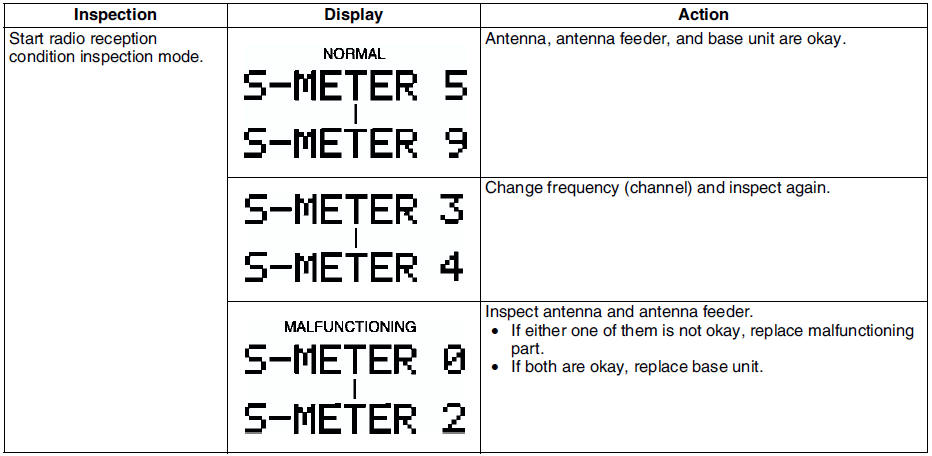
3. Turn the audio off or the ignition switch to the LOCK position to stop the diagnostic assist function.
Audio Amplifier (External) Inspection
1. With audio on, first press the POWER button, then simultaneously press the SCAN button for approximately 1 second.
2. Inspect the audio amplifier (external) according to the following table:
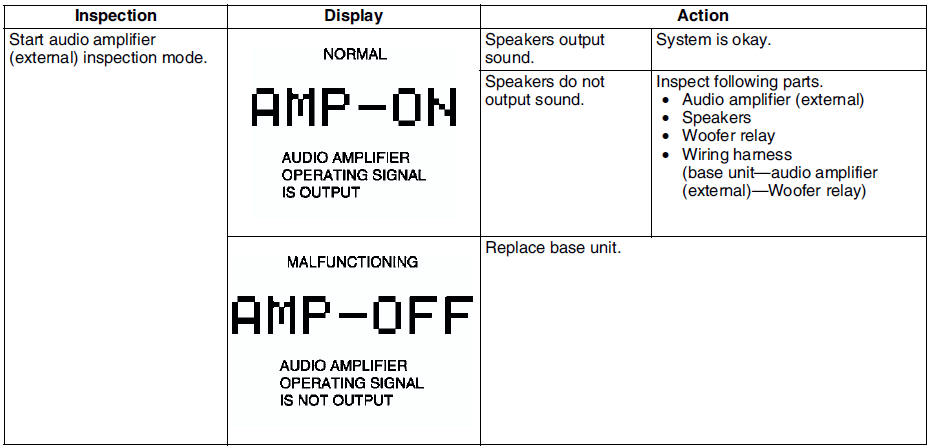
3. Turn the audio off or the ignition switch to the LOCK position to stop the diagnostic assist function.
 Dtc 07:er07
Diagnostic procedure
...

Other materials:
Mazda 6 Service Manual: Clock spring adjustment
Note
The adjustment procedure is also specified on the caution label of
the clock spring.
1. Set the front wheels straight ahead.
Caution
The clock spring will break if over-wound. Do not forcibly turn
the clock spring.
2. Turn the clock spring clockwise until it stops.
3. Tu ...
Mazda 6 Service Manual: Curtain air bag module removal/installation
Warning
Handling the air bag module improperly can accidentally deploy the air bag
module, which may seriously injure you. Read AIR BAG SYSTEM SERVICE WARNINGS
before handling the air bag module. (See SERVICE WARNINGS.)
1. Turn the ignition switch to LOCK position.
2. Disconnect the nega ...