Mazda 6 Service Manual: Extractor chamber removal/installation
1. Remove the rear bumper. (See REAR BUMPER REMOVAL/INSTALLATION.)
2. Remove the left side trunk side trim.
3. Remove the screw.
4. Squeeze the clips with your fingers and remove the extractor chamber from the vehicle side.
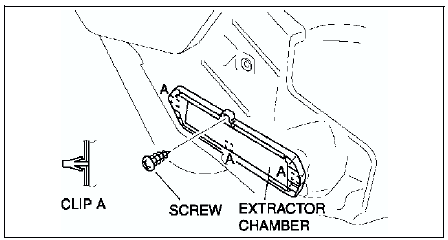
5. Install in the reverse order of removal.
 Side protector installation
1. Remove the adhesive remaining on the side protector (if it will be reused)
and the body using a razor.
2. Remove any grease or dirt from the adhesion surface of the side protector
(if it will ...
 Rear finisher removal/installation
1. Remove the trunk lid trim (4SD).
2. Remove the liftgate lower trim (5HB).
3. Remove the nuts.
4. Pull the rear finisher toward you, then disengage clip A from the body.
5. Install in the reve ...
Other materials:
Mazda 6 Service Manual: Valve clearance inspection
1. Disconnect the negative battery cable.
2. Remove the tire (RH).
3. Remove the splash shield (RH).
4. Remove the spark plugs. (See SPARK PLUG REMOVAL/INSTALLATION.)
5. Remove the high-tension lead.
6. Remove the oil control valve (OCV) connector.
7. Remove the ventilation hose.
8. Remove th ...
Mazda 6 Service Manual: Dtc c1148, c1158, c1168, c1178, c1233, c1234, c1235, c1236
Caution
When attaching the tester lead to the ABS (ABS/TCS) HU/CM harness
connector, the SST (49 G066 001) must be used. (See ABS (ABS/TCS) HU/CM
INSPECTION.)
Diagnostic procedure
...