Mazda 6 Service Manual: Front crossmember removal/installation
1. Remove the under cover.
2. Remove the splash shield.
3. Remove the front auto leveling sensor. (See FRONT AUTO LEVELING SENSOR REMOVAL/INSTALLATION.)
4. Remove the transverse member. (See TRANSVERSE MEMBER REMOVAL/INSTALLATION.)
5. Remove the steering gear and linkage, and pipe assembly installation bolts from the front crossmember, then suspend the steering gear and linkage with a cable.
Tightening torque
Steering gear and linkage: 74.4-104.8 N·m {7.857-10.68 kgf·m, 54.88-77.29 ft·lbf}
Pipe assembly: 7.8-10.8 N·m {79.6-110.0 kgf·cm, 69.1-95.5 in·lbf}
6. Remove in the order indicated in the table.
7. Install in the reverse order of removal.
8. Adjust the headlight zeroset. (See HEADLIGHT ZEROSET.)
9. Inspect the front wheel alignment. (See FRONT WHEEL ALIGNMENT.)
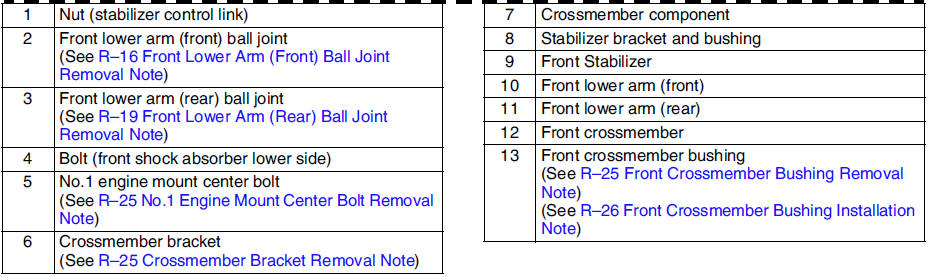
No.1 Engine Mount Center Bolt Removal Note
1. Suspend the engine using the SST
.
2. Remove the No.1 engine mount center bolt.
Crossmember Bracket Removal Note
Warning
- Removing the crossmember is dangerous. The crossmember component could fall and cause serious injury or death. Verify that the jack securely supports the crossmember component before removing the crossmember bracket.
1. Support the crossmember component with a jack and remove the nuts.
2. Remove the crossmember bracket.
Front Crossmember Bushing Removal Note
1. Mark the crossmember as shown in the figure (rear upper side only).

2. Remove the bushings using screw driver (-), being care not to damage the front crossmember.
Front Crossmember Bushing Installation Note
1. Set the bushings as shown in the figure.
2. Install the bushing onto the crossmember using the SSTs
.
 Stabilizer control link inspection
1. Remove the stabilizer control link from the vehicle.
2. Inspect for bending and damage.
3. Measure the ball joint starting torque.
(1) Rock the ball joint stud side to side 10 times.
(2) Ro ...
 Transverse member removal/installation
1. Remove in the order indicated in the table.
2. Install in the reverse order of removal.
Transverse Cover Installation Note
1. Install the transverse cover.
2. Stake area A as shown in the f ...
Other materials:
Mazda 6 Service Manual: Battery Recharging
NOTE
Before performing maintenance or recharging the battery, turn off all
accessories and stop the engine.
To disconnect the battery, remove the negative cable first. Install it
last when connecting the battery.
Be sure to remove the caps before recharging the battery.
I ...
Mazda 6 Service Manual: Automatic Brake Operation Display (Type A Instrument Cluster)
“Smart City Brake Support activated” is indicated in the active driving display,
and “Smart City Brake Support Activated” is indicated in the multi-information display
after the SCBS brakes or the brake assist (SCBS brake assist) is operated.
NOTE
The collision warning beep sounds ...