Mazda 6 Service Manual: Front lower arm (rear) inspection
1. Remove the lower arm (rear) from the vehicle.
2. Inspect for damage, cracks, and bending.
3. Inspect the ball joint rotation torque.
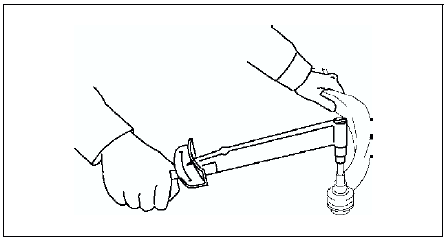
(1) Rotate the ball joint five times.
(2) Measure the rotation torque using a suitable allen socket and a torque wrench.
- If not within the specification, replace the lower arm component.
Rotation torque
1.00-2.22 N·m
{10.2-22.6 kgf·cm, 8.86-19.6 in·lbf}
 Front lower arm (rear) removal/installation
1. Remove the front crossmember component. (See FRONT CROSSMEMBER
REMOVAL/INSTALLATION.)
2. Remove in the order indicated in the table.
3. Install in the reverse order of removal.
4. Inspect the ...
 Front stabilizer removal/installation
1. Remove the front crossmember component. (See FRONT CROSSMEMBER
REMOVAL/INSTALLATION.)
2. Remove in the order indicated in the table.
3. Install in the reverse order of removal.
4. Adjust the h ...
Other materials:
Mazda 6 Service Manual: Generator inspection
Generator Warning Light
1. Verify that the battery is fully charged.
Charge if necessary.
2. Verify that the drive belt deflection/tension is correct. (See DRIVE BELT
INSPECTION.)
If not as specified, replace the drive belt.
3. Turn the ignition switch to ON and verify that the gene ...
Mazda 6 Service Manual: Seat Belt Extender
If your seat belt is not long enough, even when fully extended, a seat belt extender
may be available to you at no charge from your Authorized Mazda Dealer.
This extender will be only for you and for the particular vehicle and seat. Even
if it plugs into other seat belts, it may not hold in the ...