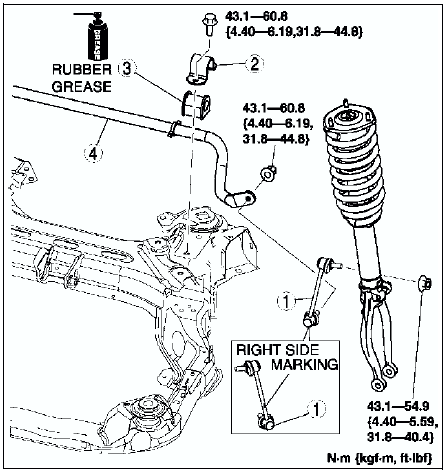
Mazda 6 Service Manual: Front stabilizer removal/installation
1. Remove the front crossmember component. (See FRONT CROSSMEMBER REMOVAL/INSTALLATION.)
2. Remove in the order indicated in the table.
3. Install in the reverse order of removal.
4. Adjust the headlight zeroset. (See HEADLIGHT ZEROSET.)
5. Inspect the front wheel alignment. (See FRONT WHEEL ALIGNMENT.)
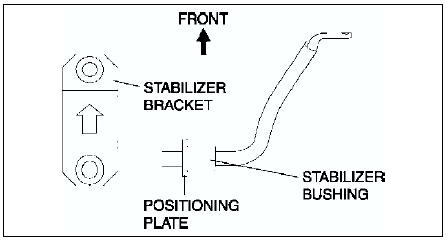
Stabilizer Bracket Installation Note
1. Apply rubber grease to the inside surface of the stabilizer bushing.
2. Align the bushing with the inside of positioning plate on the stabilizer bar.
3. Install the stabilizer bracket.
 Front lower arm (rear) inspection
1. Remove the lower arm (rear) from the vehicle.
2. Inspect for damage, cracks, and bending.
3. Inspect the ball joint rotation torque.
(1) Rotate the ball joint five times.
(2) Measure the ...
 Stabilizer control link inspection
1. Remove the stabilizer control link from the vehicle.
2. Inspect for bending and damage.
3. Measure the ball joint starting torque.
(1) Rock the ball joint stud side to side 10 times.
(2) Ro ...
Other materials:
Mazda 6 Service Manual: Rear seat removal/installation
4SD
1. Remove in the order indicated in the table.
2. Install in the reverse order of removal.
5HB
1. Remove in the order indicated in the table.
2. Install in the reverse order of removal.
Remote wire removal note
1. Turn over the trunk floor mat.
2. Remove the case.
3. Remove the ...
Mazda 6 Service Manual: Location index
INTAKE-AIR SYSTEM
FUEL SYSTEM
Engine Room Side
Fuel tank side
EMISSION SYSTEM
Engine room side
CONTROL SYSTEM
...