Mazda 6 Service Manual: Headlight aiming
Low-beam
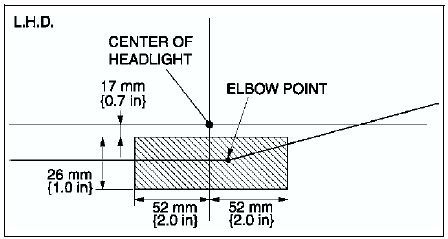
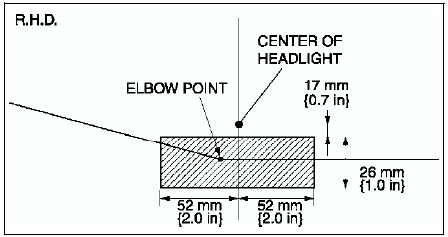
1. Set up a screen as shown in the figure below for aiming the headlights.
2. Adjust the tire air pressure to the specification.
3. Position the unloaded vehicle on a flat, level surface.
4. Seat one person in the driver's seat.
5. Position the vehicle straight ahead and perpendicular to a wall.
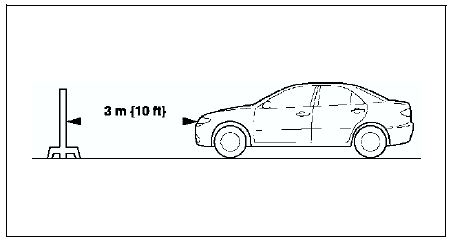
6. Set the headlights 3 m {10 ft}
from the wall.
7. While adjusting one headlight, mask the other.
8. Start the engine to charge the battery.
9. Turn on the lower-beam headlight.
10. Set the headlight leveling switch to 0 position.
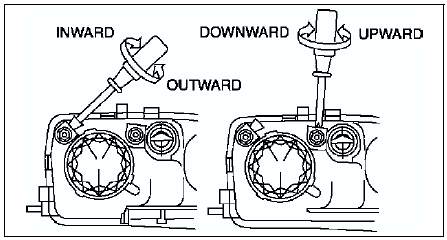
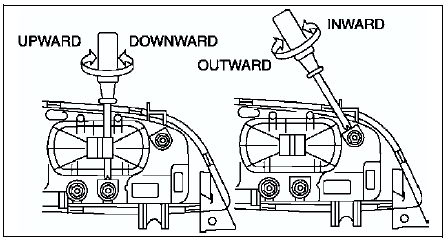
11. Adjust the headlights by turning the adjusting screws as shown in the figure. Loosen the screws first, then tighten them.
Note
- If the adjusting screws are tightened first, then loosened, they will continue to loosen when the vehicle is in motion and may cause the headlights to become misaligned.
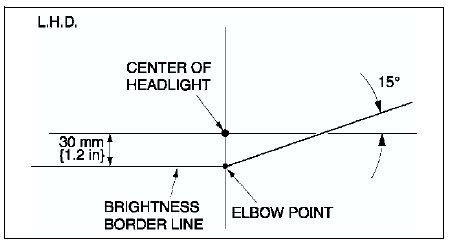
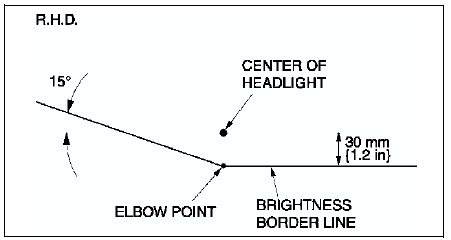
12. Turn the adjusting screws and adjust the headlight so that the elbow point in the shaded area in the figure.
High-beam
1. Adjust the tire air pressure to the specification.
2. Position the unloaded vehicle on a flat, level surface.
3. Seat one person in the driver's seat.
4. Position the vehicle straight ahead and perpendicular to a wall.
5. Set the headlights 3 m {10 ft}
from the wall.

6. While adjusting one headlight, mask the other.
7. Start the engine to charge the battery.
8. Turn on the high-beam headlights.
9. Set the headlight leveling switch to 0 position.
10. Adjust the headlights by turning the adjusting screws as shown in the figure. Loosen the screws first, then tighten them.
Note
- If the adjusting screws are tightened first, then loosened, they will continue to loosen when the vehicle is in motion and may cause the headlights to become misaligned.
 Front combination light removal/installation
Caution
Incorrect servicing of the discharge headlights could result in
electrical shock. Before servicing the discharge headlights, always refer to
the Discharge headlight service warnings. ...
 Headlight bulb removal/installation
Low-beam
Halogen type
1. Disconnect the negative battery cable.
2. Disconnect the front combination light. (See FRONT COMBINATION LIGHT
REMOVAL/INSTALLATION)
3. Remove in the order indicated in ...
Other materials:
Mazda 6 Service Manual: Underbody Maintenance
Road chemicals and salt used for ice and snow removal and solvents used for dust
control may collect on the underbody. If not removed, they will speed up rusting
and deterioration of such underbody parts as fuel lines, frame, floor pan, and exhaust
system, even though these parts may be coated ...
Mazda 6 Service Manual: Selector lever disassembly/assembly
1. Disassemble in the order shown in the figure.
2. Assemble in the reverse order of disassembly.
Connector Disassembly Note
1. Insert a thin piece of metal from the terminal side of the connector, and
press down the terminal locking tab.
2. Pull the terminal out of the connector. ...