Mazda 6 Service Manual: Mass air flow (maf) sensor inspection
Voltage Inspection
Note
- Perform the following inspection only when directed.
1. Visually inspect for the following on the MAF sensor.
- Damage
- Cracks
- Terminal bends
- Terminal rust
- If any of the above are found, replace the MAF sensor.
- If the MAF PID value is out of specification, carry out the Circuit Open/Short Inspection.
Circuit Open/Short Inspection
1. Disconnect the PCM connector. (See PCM REMOVAL/INSTALLATION.)
2. Disconnect the MAF sensor connector.
3. Inspect the following wiring harnesses for open or short. (Continuity check)
Open circuit
- If there is no continuity, the circuit is open. Repair or replace the harness.
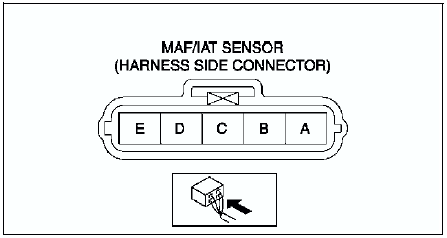
- MAF sensor terminal A (harness-side) and main relay terminal C (harness-side)
- MAF sensor terminal B (harness-side) and PCM terminal 2AC (harness-side)
- MAF sensor terminal C (harness-side) and PCM terminal 1P (harness-side)
Short circuit
- If there is continuity, the circuit is shorted. Repair or replace the harness.
- MAF sensor terminal A (harness-side) and body GND
- MAF sensor terminal C (harness-side) and power supply
- MAF sensor terminal C (harness-side) and body GND
- MAF sensor terminal B (harness-side) and power supply
 Intake air temperature (iat) sensor inspection
Resistance Inspection
Note
Perform the following inspection only when directed.
1. Disconnect MAF/IAT sensor.
2. Measure the resistance between the MAF/IAT sensor terminals D and E using
an ...
 Throttle position (tp) sensor inspection
Note
Perform the following inspection only when directed.
Resistance Inspection
1. Perform the following test only when directed.
If as specified but TP PID value is out of specification, ...
Other materials:
Mazda 6 Service Manual: No.4 air intake mode does not change
When performing an asterisked (*) troubleshooting inspection, shake the
wiring harness and connectors while performing the inspection to discover
whether poor contact points are the cause of any intermittent malfunctions.
If there is a problem, check to make sure connectors, terminal ...
Mazda 6 Service Manual: Oil seal (differential) replacement
1. On level ground, jack up the vehicle and support it evenly on safety
stands.
2. Drain the oil from the transaxle.
3. Remove the front wheels and splash shields.
4. Separate the drive shaft and joint shaft from the transaxle. (See DRIVE
SHAFT REMOVAL/INSTALLATION.) (See JOINT SHAFT REMOVAL/ ...