Mazda 6 Service Manual: Power steering fluid inspection
Fluid Level Inspection
1. Inspect the power steering fluid level.
- Add fluid to the specified level as necessary.
Fluid specification ATF M-III or equivalent (e.g. Dexron®II)
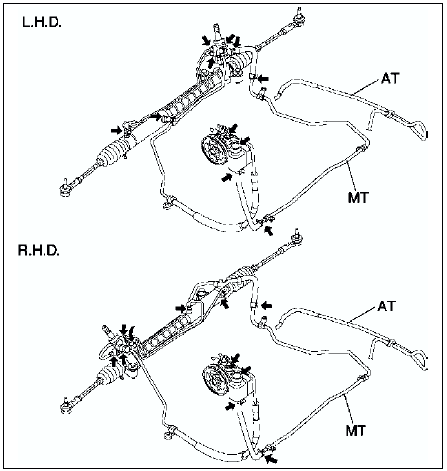
Fluid Leakage Inspection
1. Start the engine and let it idle.
2. Turn the steering wheel fully to the left and right to apply fluid pressure.
Caution
- If the steering wheel is kept in the fully turned position for more than 5 seconds, the fluid temperature will rise excessively and adversely affect the oil pump.
3. Inspect for fluid leakage.
- If fluid leakage is found, replace related pipe or hose.
Note
- The points where fluid leakage may occur are indicated in the figure.
Fluid Pressure Inspection
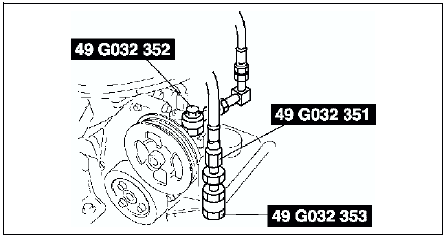
1. Assemble the SSTs
as shown in the figure.
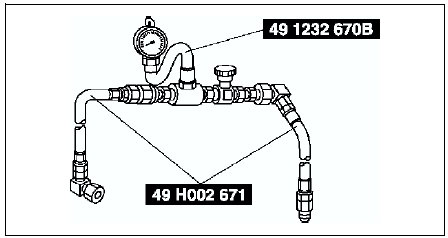
2. Disconnect the pressure pipe from the oil pump, and connect the SSTs.
Tightening torque 29.4-44.1 N·m {3.0-4.4 kgf·m, 22-32 ft·lbf}
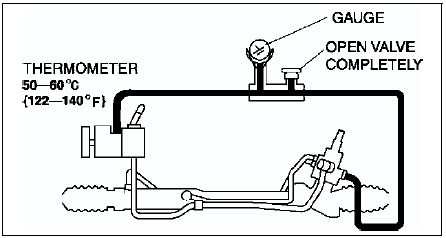
3. Bleed the air from the system.
4. Open the gauge valve fully.
5. Start the engine and turn the steering wheel fully left and right to raise the fluid temperature to 50-60 °C {122-140 ° F}.
6. Close the gauge valve completely.

7. Increase the engine speed to 1,000-1,500 rpm
and measure the fluid pressure generated by the oil pump.
- If the pressure is not within the specification, repair or replace the oil pump component.
Caution
- If the valve is left closed for more than 5 seconds, the fluid temperature will rise excessively and adversely affect the oil pump.
Oil pump fluid pressure 10.80-11.29 MPa {110.2-115.2 kgf/cm2, 1567-1637 psi}
8. Open the gauge valve fully and increase the engine speed to 1,000-1,500 rpm.
9. Turn the steering wheel fully to the left and right, then measure the fluid pressure generated at the gear housing.
- If the pressure is not within the specification, repair or replace the steering gear component.
Caution
- If the steering wheel is kept in the fully turned position for more than 5 seconds, the fluid temperature will rise excessively and adversely affect the oil pump.
Gear housing fluid pressure 10.80-11.29 MPa {110.2-115.2 kgf/cm2, 1567-1637 psi}
10. Remove the SSTs. Install and tighten the pressure pipe to the specified torque.
Tightening torque 29.4-44.1 N·m {3.0-4.4 kgf·m, 22-32 ft·lbf}
11. Bleed the air from the system.
 Air bleeding
1. Inspect the fluid level. (See POWER STEERING FLUID INSPECTION.)
2. Jack up the front of the vehicle and support it on safety stands.
3. Turn the steering wheel fully to the left and right several ...
 Steering wheel and column inspection
Steering Wheel Play Inspection
With the wheels in the straight-ahead position, gently turn the steering
wheel to the left and right and verify that the play is within the
specification.
If th ...
Other materials:
Mazda 6 Service Manual: Declaration of Conformity
Keyless Entry System/Immobilizer System
Blind Spot Monitoring (BSM) System
NOTE
During printing time of this user manual the approvals listed above are granted.
WARNING
Change or modifications not expressively approved by the party responsible
for compliance could void the use's authori ...
Mazda 6 Service Manual: Washer Fluid
Inspecting Washer Fluid Level
WARNING
Use only windshield washer fluid or plain water in the reservoir:
Using radiator antifreeze as washer fluid is dangerous. If sprayed on the windshield,
it will dirty the windshield, affect your visibility, and could result in an accident.
Using Washer Flu ...