Mazda 6 Service Manual: Extractor chamber removal/installation
1. Remove the rear bumper. (See REAR BUMPER REMOVAL/INSTALLATION.)
2. Remove the left side trunk side trim.
3. Remove the screw.
4. Squeeze the clips with your fingers and remove the extractor chamber from the vehicle side.
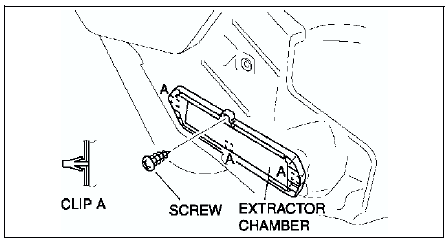
5. Install in the reverse order of removal.
 Side protector installation
1. Remove the adhesive remaining on the side protector (if it will be reused)
and the body using a razor.
2. Remove any grease or dirt from the adhesion surface of the side protector
(if it will ...
 Rear finisher removal/installation
1. Remove the trunk lid trim (4SD).
2. Remove the liftgate lower trim (5HB).
3. Remove the nuts.
4. Pull the rear finisher toward you, then disengage clip A from the body.
5. Install in the reve ...
Other materials:
Mazda 6 Service Manual: Immobilizer system reprogram procedure
Note
When an error occurs during the reprogram procedures, except when
the PCM is replaced, repeat the procedure from Step 1. If you still cannot
reprogram, confirm how many keys can start the engine. Then, perform the key
replacement or addition reprogram procedure according to the val ...
Mazda 6 Service Manual: Clutch disc inspection
1. Using vernier calipers, measure the thickness of the lining at a rivet
head on both sides.
Replace the clutch disc if its thickness is less than the minimum.
Thickness
0.3 mm {0.012 in} min.
2. Measure the clutch disc runout using a dial indicator.
If the runout is excessiv ...