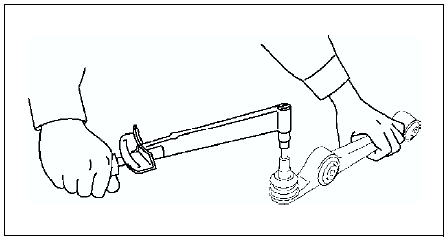
Mazda 6 Service Manual: Front lower arm (front) inspection
1. Remove the lower arm (front) from the vehicle.
2. Inspect for damage, cracks, and bending.
3. Inspect the ball joint rotation torque.

(1) Rotate the ball joint five times.
(2) Measure the rotation torque using a suitable allen socket and a torque wrench.
- If not within the specification, replace the lower arm component.
Rotation torque
1.18-2.23 N·m
{12.1-22.7 kgf·cm, 10.5-19.7 in·lbf}
 Front lower arm (front) removal/installation
1. Remove in the order indicated in the table.
2. Install in the reverse order of removal.
Front Lower Arm (Front) Ball Joint Removal Note
Separate the ball joint from the knuckle using the SST ...
 Front lower arm (rear) removal/installation
1. Remove the front crossmember component. (See FRONT CROSSMEMBER
REMOVAL/INSTALLATION.)
2. Remove in the order indicated in the table.
3. Install in the reverse order of removal.
4. Inspect the ...
Other materials:
Mazda 6 Service Manual: Front bumper removal/installation
1. Disconnect the negative battery cable.
2. Remove in the order indicated in the table.
3. Install in the reverse order of removal.
Front Bumper Removal Note
1. Pull the front bumper ends (wheel arch) outward to disengage from the
bumper slider.
Caution
If only one side of the front ...
Mazda 6 Service Manual: Receiving and Replying to Messages (available only with E-mail/SMS compatible
phones)
SMS (Short Message Service) messages, and E-mail received by connected devices
can be downloaded, displayed, and played (read by the system).
Additionally, replies can also be made to calls and messages in the received
messages.
Downloading messages
Up to 20 new messages can be downloaded and ...
