Mazda 6 Service Manual: Front wheel alignment
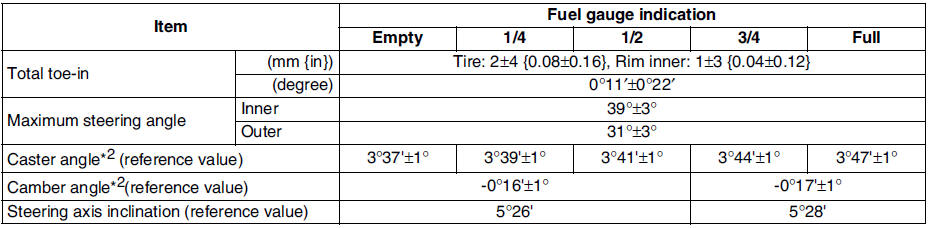
Specification (Unloaded)*1
Normal
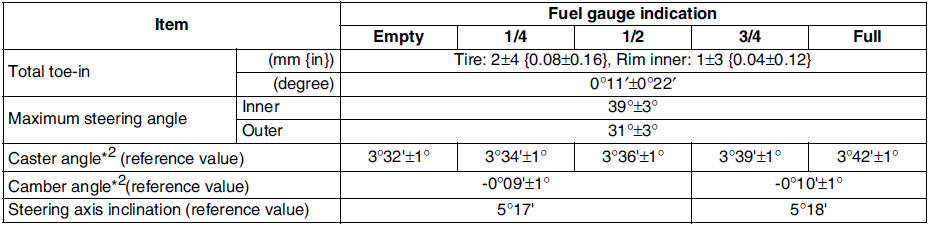
Elevated*3
*1 : Engine coolant and engine oil are at specified level. Spare tire, jack and tools are in designated position.
*2 : Difference between left and right must not exceed 1°30'.
*3 : Distance between wheel center and fender brim is 402 mm {15.8 in} (reference value).
Maximum Steering Angle Adjustment
1. Loosen the tie-rod end locknuts.
2. Remove the steering gear boot clamp.
3. Turn the tie rods to equalize the length L.
Maximum left/right difference 3 mm {0.12 in}
4. Turn the tie rods equally to provide the correct maximum steering angle.
5. Tighten the tie-rod end locknuts.
Tightening torque 68.6-98.0 N·m
{7.00-9.99 kgf·m, 50.6-72.2 ft·lbf}
6. Verify that the boot is not twisted, and install the boot clamp.
7. Adjust the toe-in after adjusting the steering angle.
Total Toe-in Adjustment
1. Center the steering wheel and confirm that the vehicle wheels/tires are pointing straight.
2. Loosen the left and right tie-rod end locknuts and turn the tie-rods equally. Both tie rods are right threaded, so turning the right tie-rod toward the front of the vehicle and the left toward the rear increases toe-in.
Note
- Turning both tie-rods one complete turn changes toe-in by about 6 mm {0.24 in} (0°36').
3. Tighten the tie-rod end locknuts to the specified torque.
Tightening torque 68.6-98.0 N·m {7.00-9.99 kgf·m, 50.6-72.2 ft·lbf}
4. Verify that the boot is not twisted, and install the boot clamp.
 Wheel alignment pre-inspection
1. Inspect the tire inflation, and adjust to the recommended pressure as
necessary.
2. Inspect the front wheel bearing play and correct it if necessary. (See
Wheel Bearing Play Inspection.)
3. I ...
 Rear wheel alignment
Specification (Unloaded)*1
Normal
Elevated*3
*1 : Engine coolant and engine oil are at specified level. Spare tire, jack
and tools are in designated position.
*2 : Difference between left an ...
Other materials:
Mazda 6 Service Manual: Purge solenoid valve inspection
Airflow Inspection
Note
Perform the following test only when directed.
1. Disconnect the negative battery cable.
2. Remove the purge solenoid valve. (See PURGE SOLENOID VALVE
REMOVAL/INSTALLATION.)
3. Inspect airflow between the ports under the following conditions.
If not as specifi ...
Mazda 6 Service Manual: Replacing a Tire
WARNING
Always use tires that are in good condition: Driving with worn tires
is dangerous. Reduced braking, steering, and traction could result in an accident.
Replace all four tires at the same time: Replacing just one tire
is dangerous. It could cause poor handling and poor braking resulting ...