
Mazda 6 Service Manual: Generator inspection
Generator Warning Light
1. Verify that the battery is fully charged.
- Charge if necessary.
2. Verify that the drive belt deflection/tension is correct. (See DRIVE BELT INSPECTION.)
- If not as specified, replace the drive belt.
3. Turn the ignition switch to ON and verify that the generator warning light illuminates.
- If not as specified, inspect the generator warning light.
4. Verify that the generator warning light turns off after the engine is started.
- If not specifed, inspect if any of the DTCs are displayed: P0112, P0113, P2502, P2503, P2504.
Generator
Voltage
1. Verify that the battery is fully charged.
2. Verify that the drive belt deflection/tension is correct. (See DRIVE BELT INSPECTION.)
- If not as specified, replace the drive belt.
3. Turn off all electrical loads.
4. Turn the engine switch to start the engine and verify that the generator rotates smoothly without any noise while the engine is running.
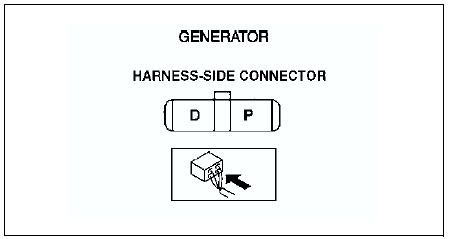
5. Measure the voltage at the terminals shown in the table.
- If not as specified, repair or replace the generator as necessary.
Standard voltage
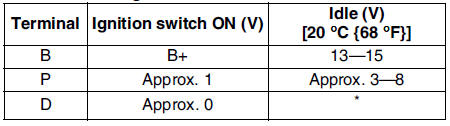
* : Turn the following electrical loads on and verify that the voltage reading increases.
- Headlights
- Blower motor
- Rear window defroster
Current
1. Verify that the battery is fully charged.
- If the battery is not fully charged, charge the battery.
2. Verify that the drive belt deflection/tension is correct. (See DRIVE BELT INSPECTION.)
- If not as specified, replace the drive belt.
3. Disconnect the negative battery cable.
4. Connect an ammeter, capable of reading 120 A or above, between generator terminal B and the wiring harness.
5. Connect the negative battery cable.
6. Turn off all electrical loards.
7. Start the engine and increase the engine speed to 2,000-2,500 rpm.
8. Turn the following electrical loads on and verify that the current reading increases.
- Headlights
- Blower motor
- Rear window defroster
- If generator terminal B current will not increase, repair or replace the generator as necessary.
Note
- Current required for generating power varies with electrical loads applied.
Standard current (Reference)
Measuring conditions Room temperature: 20 °C {68 ° F} Voltage: 13.5 V
Engine hot
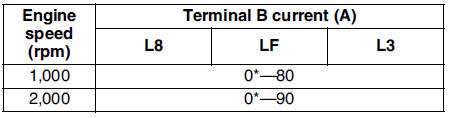
* : Must not be 0 A
 Generator removal/installation
Warning
When the battery cables are connected, touching the vehicle body with
generator terminal B will generate sparks. This can cause personal injury, fire,
and damage to the electrical comp ...
 Ignition system
...
Other materials:
Mazda 6 Service Manual: Replacing Interior Light Bulbs
Overhead lights/Front map lights (LED type), Rear map lights (LED type)
The LED bulb cannot be replaced as a single unit because it is an integrated
unit. The LED bulb has to be replaced with the unit. We recommend an Authorized
Mazda Dealer when the replacement is necessary.
Overhead lights/F ...
Mazda 6 Service Manual: Rearview Mirror
WARNING
Do not stack cargo or objects higher than the seatbacks: Cargo stacked
higher than the seatbacks is dangerous. It can block your view in the rearview mirror,
which might cause you to hit another car when changing lanes.
Rearview mirror adjustment
Before driving, adjust the rearview mi ...