Mazda 6 Service Manual: Steering gear and linkage inspection
Rack Inspection
1. Inspect the rack for cracking, damage, and tooth wear. Replace it as necessary.
2. Measure the runout of the rack.
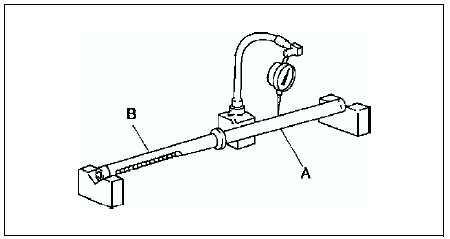
Runout
Near point A: 0.15 mm {0.006 in} max.Near point B: 0.20 mm {0.008 in} max.
3. If not within the specification, replace the rack.
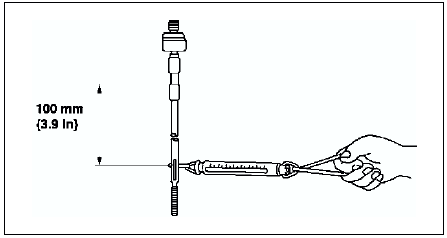
Tie-rod End Inspection
1. Inspect the tie-rod end for damage and boot cracks. Replace it as necessary.
2. Inspect the ball joint for looseness. Replace the tie-rod end as necessary.
3. Rotate the ball joint five times.
4. Measure the rotation torque of the ball joint using the SST
and a pull scale.

Rotation torque
0.4-2.7 N·m {3.5-27.5 kgf·cm, 3.1-23.8 in·lbf} Pull scale reading
3.4-25.5 N {0.35-2.60 kgf, 0.8-5.7 lbf}
5. If not within the specification, replace the tie-rod end.
Tie rod Inspection
1. Inspect the tie rod for bending and damage. Replace it as necessary.
2. Inspect the ball joint for looseness. Replace the tie rod as necessary.
3. Swing the tie rod five times.
4. Measure the swinging torque using a pull scale.
Swinging torque
0.1-4.0 N·m {1-40.7 kgf·cm, 0.9-35.3 in·lbf} Pull scale reading
0.6-24.5 N {0.06-2.49 kgf, 0.2-5.50 lbf}
5. If not within the specification, replace the tie-rod.
 Steering gear and linkage disassembly
Caution
Place copper plates, rag, or similar material in a vise, when
securing the mounting bracket portion of the steering gear.
Disassemble in the order indicated in the table.
.
Tie ...
 Steering gear and linkage assembly
Caution
Place copper plates, rag, or similar material in a vise, when
secure the mounting bracket portion of the steering gear.
Assemble in the order indicated in the table.
Mounting Ru ...
Other materials:
Mazda 6 Service Manual: Volume/Display/Sound Controls
Volume adjustment
Turn the commander switch volume dial.
The volume switch on the steering switch can also be pressed.
Display setting
Select the icon on the home
screen to display the Settings screen.
Select the tab to select the
item you would like to change.
Display OFF/Clock
The c ...
Mazda 6 Service Manual: Heated Steering Wheel (Some models)
The grips on the left and right of the steering wheel can be warmed up.
The ignition must be switched ON.
Press the switch to turn on the heated steering wheel. The heated steering wheel
operates for about 30 minutes and then turns off automatically.
The indicator light illuminates when the h ...