
Mazda 6 Owners Manual: Audio Set
NOTE
The explanation of functions described in this manual may differ from the actual operation, and the shapes of screens and buttons and the letters and characters displayed may also differ from the actual appearance.
Additionally, depending on future software updates, the content may successively change without notice.
Audio Set has three different human interfaces.
- Commander switch
- Touch panel
- Voice recognition with steering switch and microphone
Commander switch operation
NOTE
For safety reasons, some operations are disabled while the vehicle is being driven.
Volume dial operation
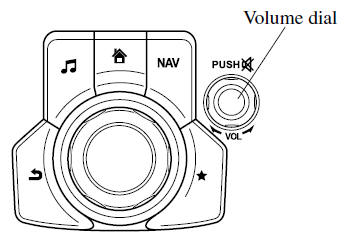
Press the volume dial to switch the audio MUTE on and off.
Turn the volume dial to adjust the volume. The volume increases by turning the dial clockwise, and decreases by turning it counterclockwise.
Switches around commander knob
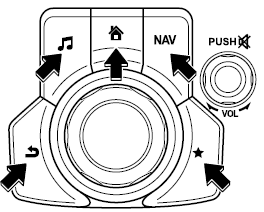
The following operations can be done by pressing the switches around the commander knob.
 : Displays the home screen.
 : Displays the Entertainment
screen.
 : Displays the Navigation screen
(Only navigation-equipped vehicles). For operation of the Navigation screen, refer
to the navigation system manual. If the SD card for the navigation system is not
inserted, the compass indicating the direction in which the vehicle is moving is
displayed.
 : Displays the Favorites screen.
Long-press to store particular items in Favorites. (Radio, phonebook and destination
of the navigation system can be programmed.)
 : Returns to previous screen.
Commander knob operation
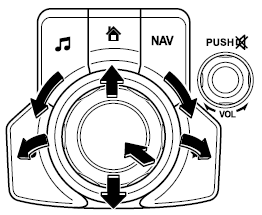
(Selection of icons on screen)
1. Tilt or turn the commander knob and move the cursor to the desired icon.
2. Press the commander knob and select the icon.
NOTE
Long-press operation of the commander knob is also possible for some functions.
Touch panel operation
CAUTION
Do not press the screen strongly or press it with a sharp-pointed object. Otherwise, the screen could be damaged.
NOTE
For safety reasons, operation of the center display is disabled while the vehicle is being driven. However, items not displayed in gray can be operated using the commander switch while the vehicle is being driven.
- Basic Operation Method
- Home screen
- Volume/Display/Sound Controls
- Operating the Radio
- Operating the Satellite Radio (Some models)
- Operating the Compact Disc (CD) Player
- How to use Auxiliary jack/USB port
- Settings
- Applications
 Operating Tips for USB device
This unit plays audio files as follows:
CAUTION
Do not use an audio file extension on files other than audio files. In addition,
do not change the audio file extension. Otherwise, the unit will ...
 Basic Operation Method
TOUCH & TAP
1. Touch or tap on the item indicated on the screen.
2. The operation is launched and the next item is displayed.
SLIDE
1. Touch the setting item displaying a slider bar.
2. Tou ...
Other materials:
Mazda 6 Owners Manual: Oil cooler removal/installation
1. Disconnect the negative battery cable.
2. Drain the ATF into a container. (See AUTOMATIC TRANSAXLE FLUID (ATF)
REPLACEMENT.)
3. Remove the radiator. (See RADIATOR REMOVAL/INSTALLATION.)
4. Remove in the order indicated in the table.
5. Install in the reverse order of removal.
6. Add ATF to ...
Mazda 6 Owners Manual: Airflow mode actuator inspection
1. Connect battery positive voltage to terminal D or F and ground to terminal
F or D of the airflow mode actuator.
2. Verify that the airflow mode actuator operates as shown below.
If not as specified, replace the airflow mode actuator.
3. Verify that the resistance between the ter ...